1) Each QR code / eSIM can only be installed once. Please do not delete the eSIM once installed. If any issues, please do not keep scanning the QR code repeatedly, as that will deactivate the eSim forever.
2) The eSim can be installed in Australia / home country
2.1) If your eSIM is the Southeast Asia / Asia Pacific eSIM and you install it in Australia, it will be activated in Australia. Do not install in Australia if you do not want it to be activated in Australia
2.2) For other eSIMs, it will only be auto-activated when you arrive at destination
3) Please scan the QR code in your device's eSIM settings to download profile. Using the Camera App to scan the code may not work for some phones, if that is the case you have to scan it through your device's mobile settings.
4) Validity of eSIM QR code is 60 or 90 days or as specified per product listing and QR code email, your eSIM has to be added and activated at the data plan coverage countries within 60 or 90 days or as specified per product listing, otherwise it will be expired.
5) If there is a problem during setup and activation, please ensure you have a good Wifi connection, and try removing the physical sim in the phone and restart. If required, please contact us with your order number.
For troubleshooting, please see the end of this guide.
A. Setup Steps:
Please ensure you are connected to a stable Wi-fi network (e.g. Home / Office / Airport / Hotel Wifi)
1) Go to Settings-> Mobile -> Add eSim

2) Set Up Mobile -> Use QR Code -> Scan QR Code

3) On Activate eSIM screen, click Continue
4) The status will become Activating ... then Connecting to network ...

5) Please wait for 2 to 3 minutes. The status will become "You can continue using your iPhone while your eSIM is activating." Please click Continue
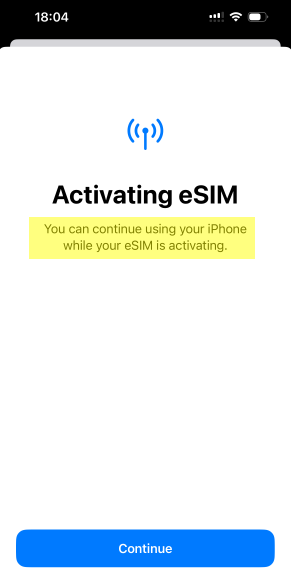
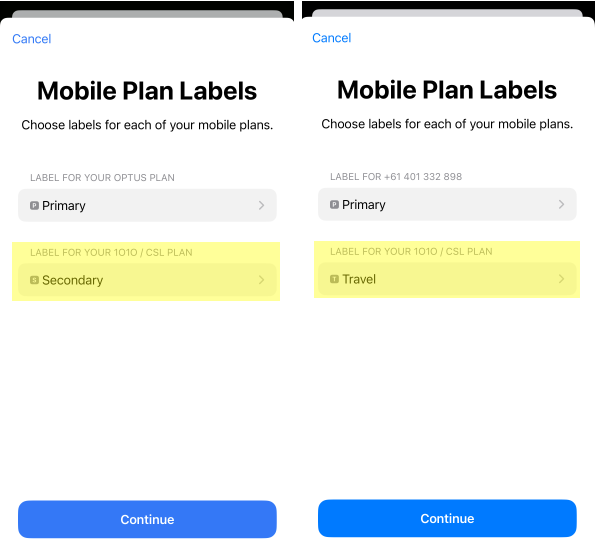
6) Done! By default, your new eSIM will be labeled as Secondary. Here you can also rename it to Travel for easy recognition.
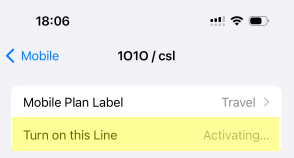
7) The status of the new eSim will remain at Activating... It is normal and you can leave it at that status.
8) Installation is now complete. Please note activation will only start when you arrive at destination.
9) About an hour after installation, the status Activating ... will finish, it will become On, and you can turn it off by un-ticking Turn on this Line
B. Auto-activate and start using the eSim at destination:
1) When arriving at destination, in Settings-> Mobile please turn off your Primary sim, and turn on your new Travel eSIM
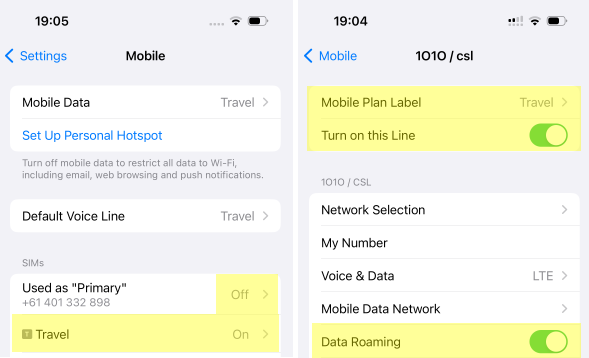
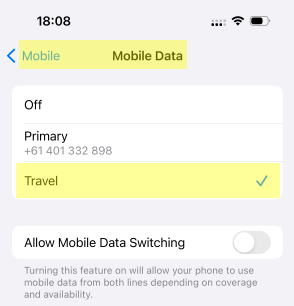
2) In Settings-> Mobile -> Mobile Data -> Choose the new Travel eSIM
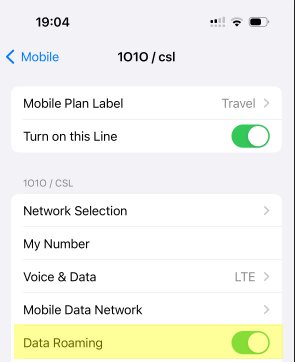
3) Very Important: Turn on Data Roaming
4) You can now start using the eSim at destination
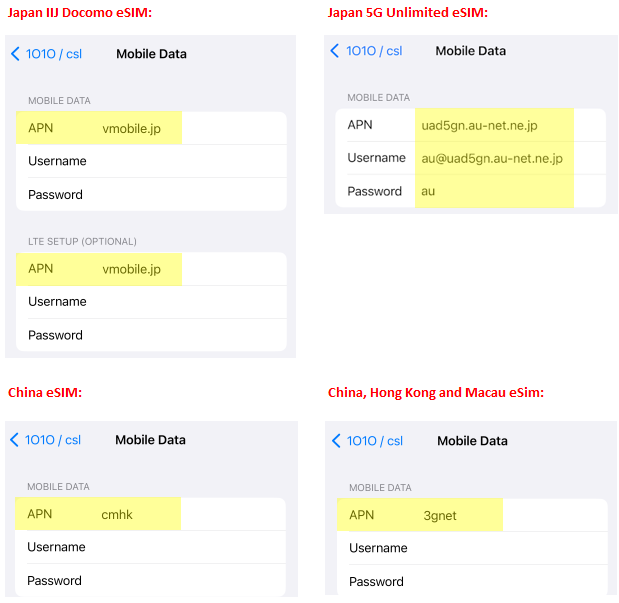
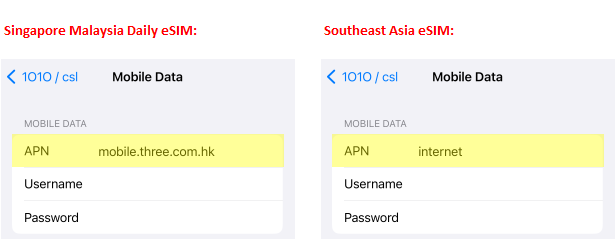
5) If you have problem accessing the internet, you may need to update the Access Point Name APN manually. Please check your email for the APN information.
Go to Settings-> Mobile -> Travel -> Mobile Data Network -> Update APN accordingly to the email
6) Please also see Troubleshooting Guide if any issue.
A. Setup Steps:
Please ensure you are connected to a stable Wi-fi network (e.g. Home / Office / Airport / Hotel Wifi)
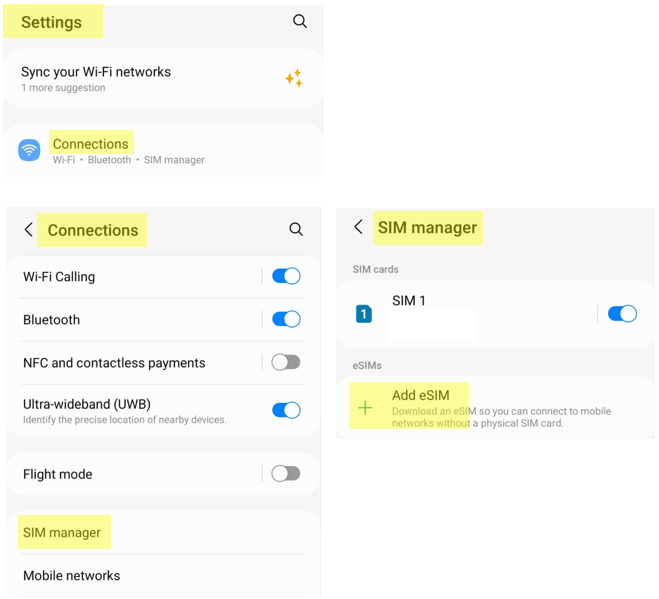
1) Go to Settings -> Connections -> SIM manager -> Add eSIM
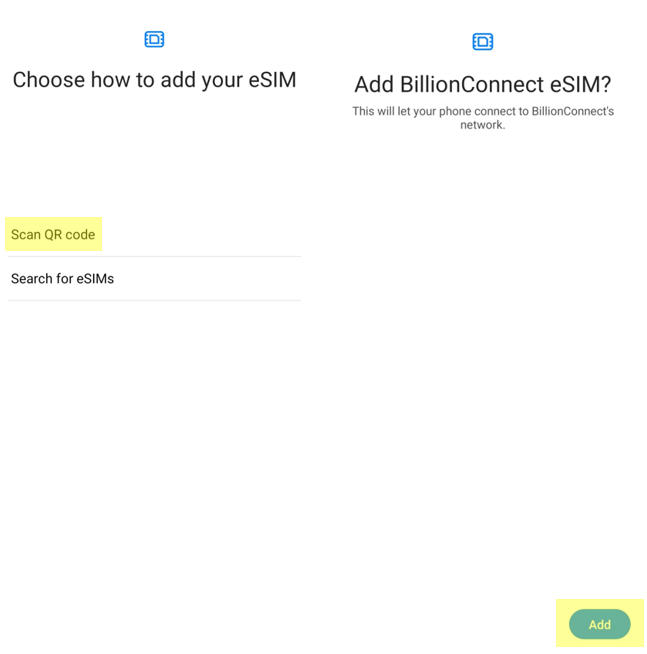
2) Then choose Scan QR code, Add.
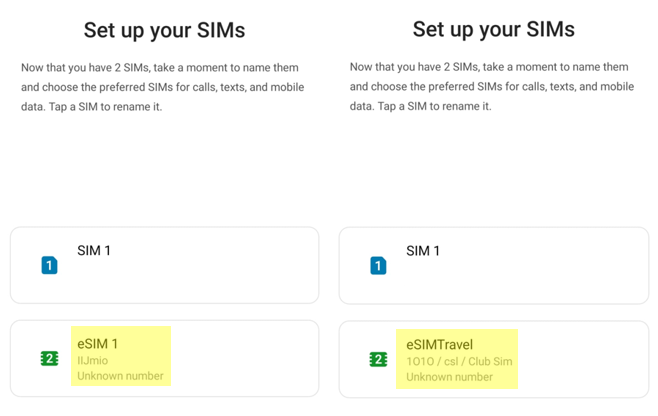
3) Done! By default, your eSIM will be named eSIM 1. Your can tab on it and rename it to eSIMTravel for easy recognition.
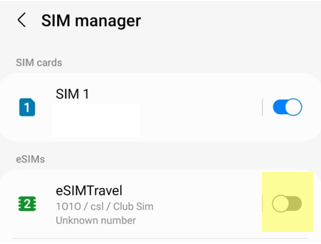
4) If you are not at destination, please turn off the eSIM. Please turn it on when you arrive at destination.
5) Installation is now complete. Please note it will auto-activate when you arrive at destination.
B. Start using the eSIM at destination
1) When arrived at destination, please turn on your eSIM and turn off your Australian sims.
2) Data Roaming must be turned on. << Very Important
All networks must be selected. << Very Important
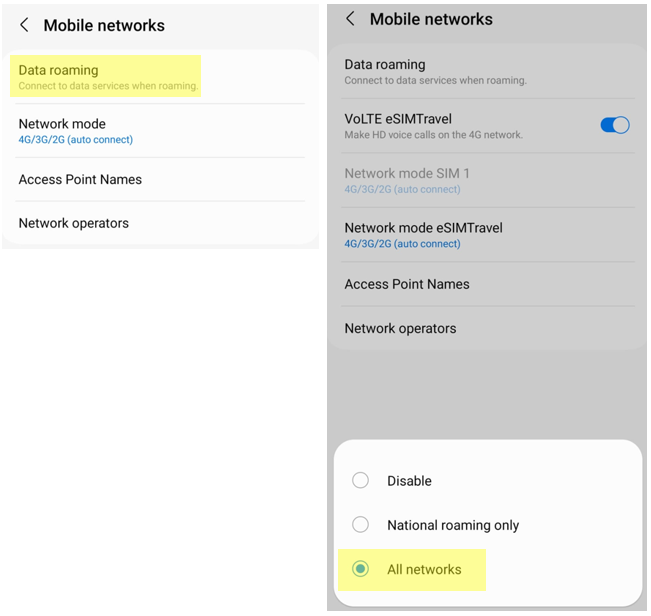
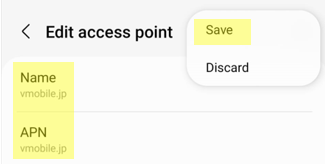
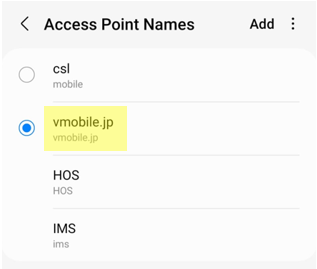
3) For Japan IIJ eSIM, if the Access Point Names is not vmobile.jp then please add a new entry of Name=vmobile.jp APN=vmobile.jp
For Japan 5G Unlimited Data eSIM, for Access Point Names, please add a new entry of Name=KDDI APN=uad5gn.au-net.ne.jp Username=au@uad5gn.au-net.ne.jp Password=au Authentication=CHAP
For Japan Daily eSIM (Softbank), if the Access Point Names is not plus.4g then please add a new entry of Name=plus.4g APN=plus.4g Username=plus Password=4g Authentication=CHAP
For other destinations, please see the troubleshooting guide at the end of this page.
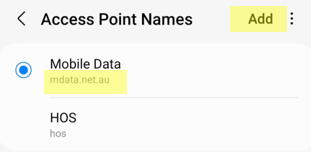
4) After adding a new Access Point Names, please click Save.
5) Afterwards, ensure it is selected.
1. Please remove any physical sim from the phone, restart phone
2. Please disable any other eSim in the phone
3. Ensure both Mobile Data and Data Roaming are turned on. << This is very important
4. Try resetting your network settings
5. For iPhone please try opening Settings > General > VPN & Device Management > Configuration Profile > Delete
6. Please check the APN settings:
Japan IIJ Docomo eSim
Android APN name: vmobile.jp
Android APN: vmobile.jp
iPhone APN: vmobile.jp
Japan 5G Unlimited Data eSIM
Android APN Name: KDDI
Android APN:uad5gn.au-net.ne.jp
Android Username:au@uad5gn.au-net.ne.jp
Android Password:au
Android Authentication:CHAP
iPhone APN:uad5gn.au-net.ne.jp
iPhone Username:au@uad5gn.au-net.ne.jp
iPhone Password:au
Japan Daily (500MB or 1GB or 2GB/Day) eSim
Android only:
APN Name: plus.4g
APN:plus.4g
Username:plus
Password:4g
Authentication:CHAP
iPhone does not need APN, please remove if any.
China only (Not China, Hong Kong and Macau)
Android APN name: cmhk
Android APN: cmhk
iPhone APN: cmhk
China, Hong Kong and Macau
Android APN name: 3gnet
Android APN: 3gnet
iPhone APN: 3gnet
New Zealand
Android APN name: plus
Android APN: plus
iPhone APN: plus
All other eSims (e.g. Korea and Southeast Asia)
Android APN name: internet
Android APN: internet
iPhone APN: internet
